In Microsoft Word remove this horizontal line that was added automatically
The developers of Word do a great job usually, not always! This horizontal line problem is an example of very bad programming. You may have seen Word entering a horizontal line, only to find out later that you cannot get rid of it! In case you realize immediately that you don’t need it, you can just press Ctrl+Z and Word removes it. What if in the meantime you wrote a couple of pages and you are not willing to sacrifice all your editing just to remove this unnecessary line?
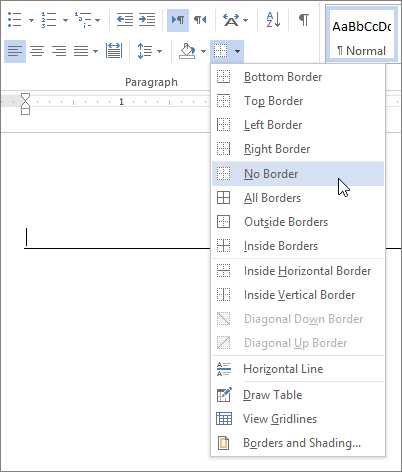
This line is a border, therefore, to remove it you need to place the cursor above it and go the “Home” menu of Word, where you will find the border options, in the “Paragraph” tab. Press the little arrow at the right of the button for the border options and select “No border”.
Your line disappears — unless you have two lines! In this case you may need to remove the second one in order to remove also the line above it! Place the cursor above the second line and select the “no border” option at the borders button in Word’s toolbar. Now both lines disappear! To prevent Word from entering horizontal lines automatically in the future, go to “File” > “Options” > “Proofing” > “Auto Correct Options” and at the “Auto format as you type” tab uncheck the “Border lines” option.
Enjoy!
 |
Being yourself an author or student you will perhaps appreciate especially this feature, that the very structure of the book will teach you how to work. The book contains even chapters on how to prepare a document for professional publishers such as Amazon. Reading Steven Adams' Writing a book or thesis in Microsoft Word you are surprised realizing it makes you want to work -- to think, write, use Word and be creative! |